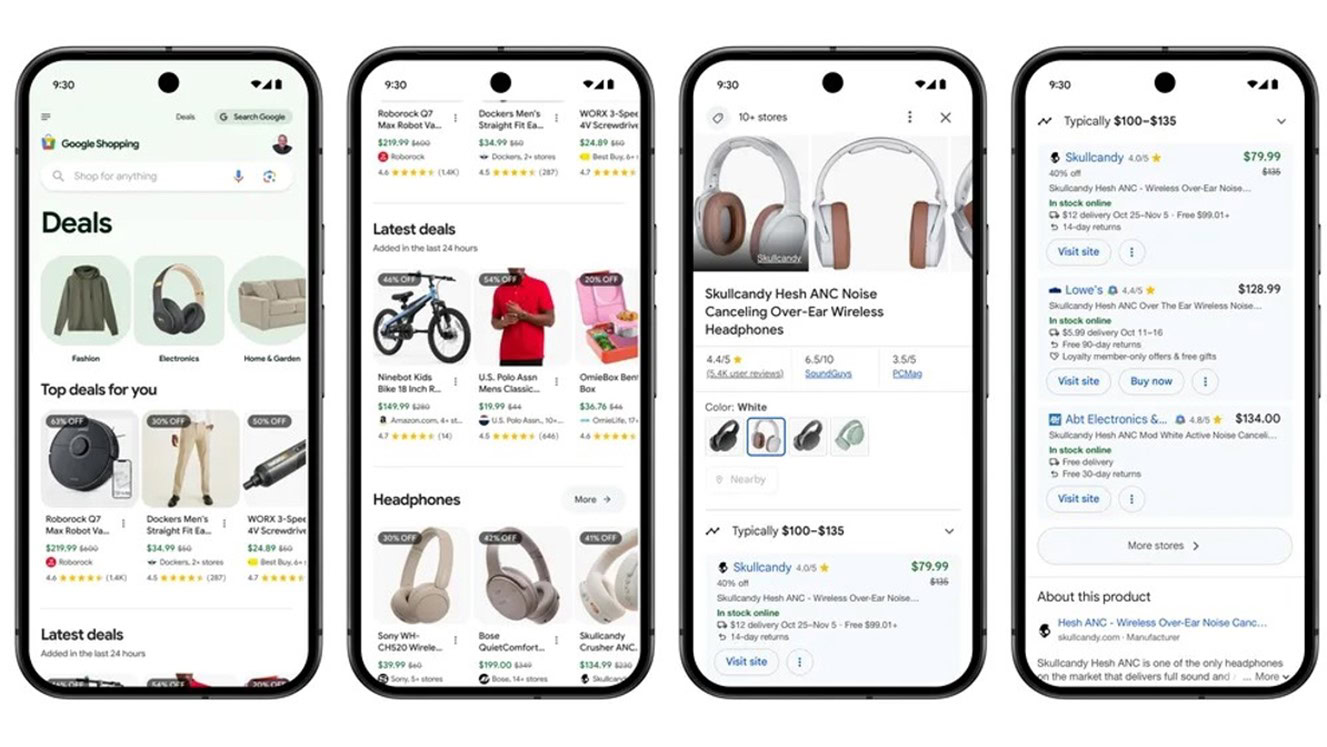
Google Shopping now offers AI-generated briefs and enhanced search tools.
A new Deals page tracks prices and finds personalized offers.
The new platform is rolling out to US customers over the coming weeks, starting today.
With the holiday season fast approaching, many of us will welcome any opportunity to make shopping for loved ones easier. It probably isn’t coincidental timing that Google Shopping is rolling out a major overhaul of the platform today. The new AI-driven interface is designed to provide users with more personalized, efficient, and comprehensive shopping options.
Announcing the upgrade in a blog post on Tuesday morning, Google explained that the transformed Shopping experience will start rolling out in the US today and over the coming weeks.
The most obvious AI-powered part of the new platform is tailored shopping “briefs” that summarize key factors for your search. For example, a search for a “Men’s winter jacket for Seattle” will provide top recommendations and important features like warmth and water resistance. This aims to save you some pre-shopping research and help you quickly narrow down your options.
Google Shopping will learn more as you go.
Once the AI assistance has you in the ballpark of what you’re after, conventional filters and categories can be used to zero in on the size, style, or availability you need. While not a brand-new feature, virtual try-ons powered by augmented reality let you see how clothes or accessories look before you buy.
Like all things AI, Google Shopping will learn more as you go, providing a personalized feed to help you pick up where you left off. The updated Deals page also keeps an eye on your favorite products, surfacing personalized offers and tracking prices to make sure you always get the best deal.
No stranger to chaotic AI launches, Google has labeled the new Shopping interface as experimental to indicate that the results may not always be perfect. Shoppers are encouraged to provide feedback on these features. The revamped Google Shopping experience is available via the Shopping Tab on Google Search or by visiting shopping.google.com.
Got a tip? Talk to us! Email our staff at [email protected]. You can stay anonymous or get credit for the info, it’s your choice.
It feels like it wasn’t many years ago that getting a 50-inch 4K TV was prohibitively expensive. Things have definitely changed, and now it’s becoming very common to run into deals that take awesome HDTVs to prices we’ve never seen before. For example, the Amazon Fire TV 50-Inch 4-Series Smart TV is usually $449.99, which is already a very reasonable price, but today you can take it home for a mere $279.99.
This deal comes from Amazon, but it isn’t accessible to everyone. This offer is exclusive to Amazon Prime members. Those interested in subscribing can learn about pricing and sign up for Prime here. Also, remember new members get a 30-day free trial, so you might not even have to pay to get this discount.
Despite being such an affordable TV, the Amazon Fire TV 50-Inch 4-Series Smart TV is a surprisingly good option. As already mentioned, it measures 50 inches diagonally and has a 4K UHD resolution of 3,840 x 2,160. Additionally, it supports HDR 10, HLG, and Dolby Digital Plus. And it comes with four HDMI ports, which is something affordable TVs don’t often have many of.
Additionally, this smart TV comes with Amazon’s own Fire TV OS platform built-in. This means you can access your favorite streaming platforms directly, including Netflix, Prime Video, YouTube, Disney Plus, Max, Peacock, and much more. Not to mention, the TV grants you direct access to Alexa, so you can use the remote for voice commands. You can request content, ask about the weather, get random information, and even control your smart home devices, among many other things.
This happens to be an all-time low price for this TV, so you should probably act quickly if you want to take advantage of this deal. These types of sales don’t usually last long.
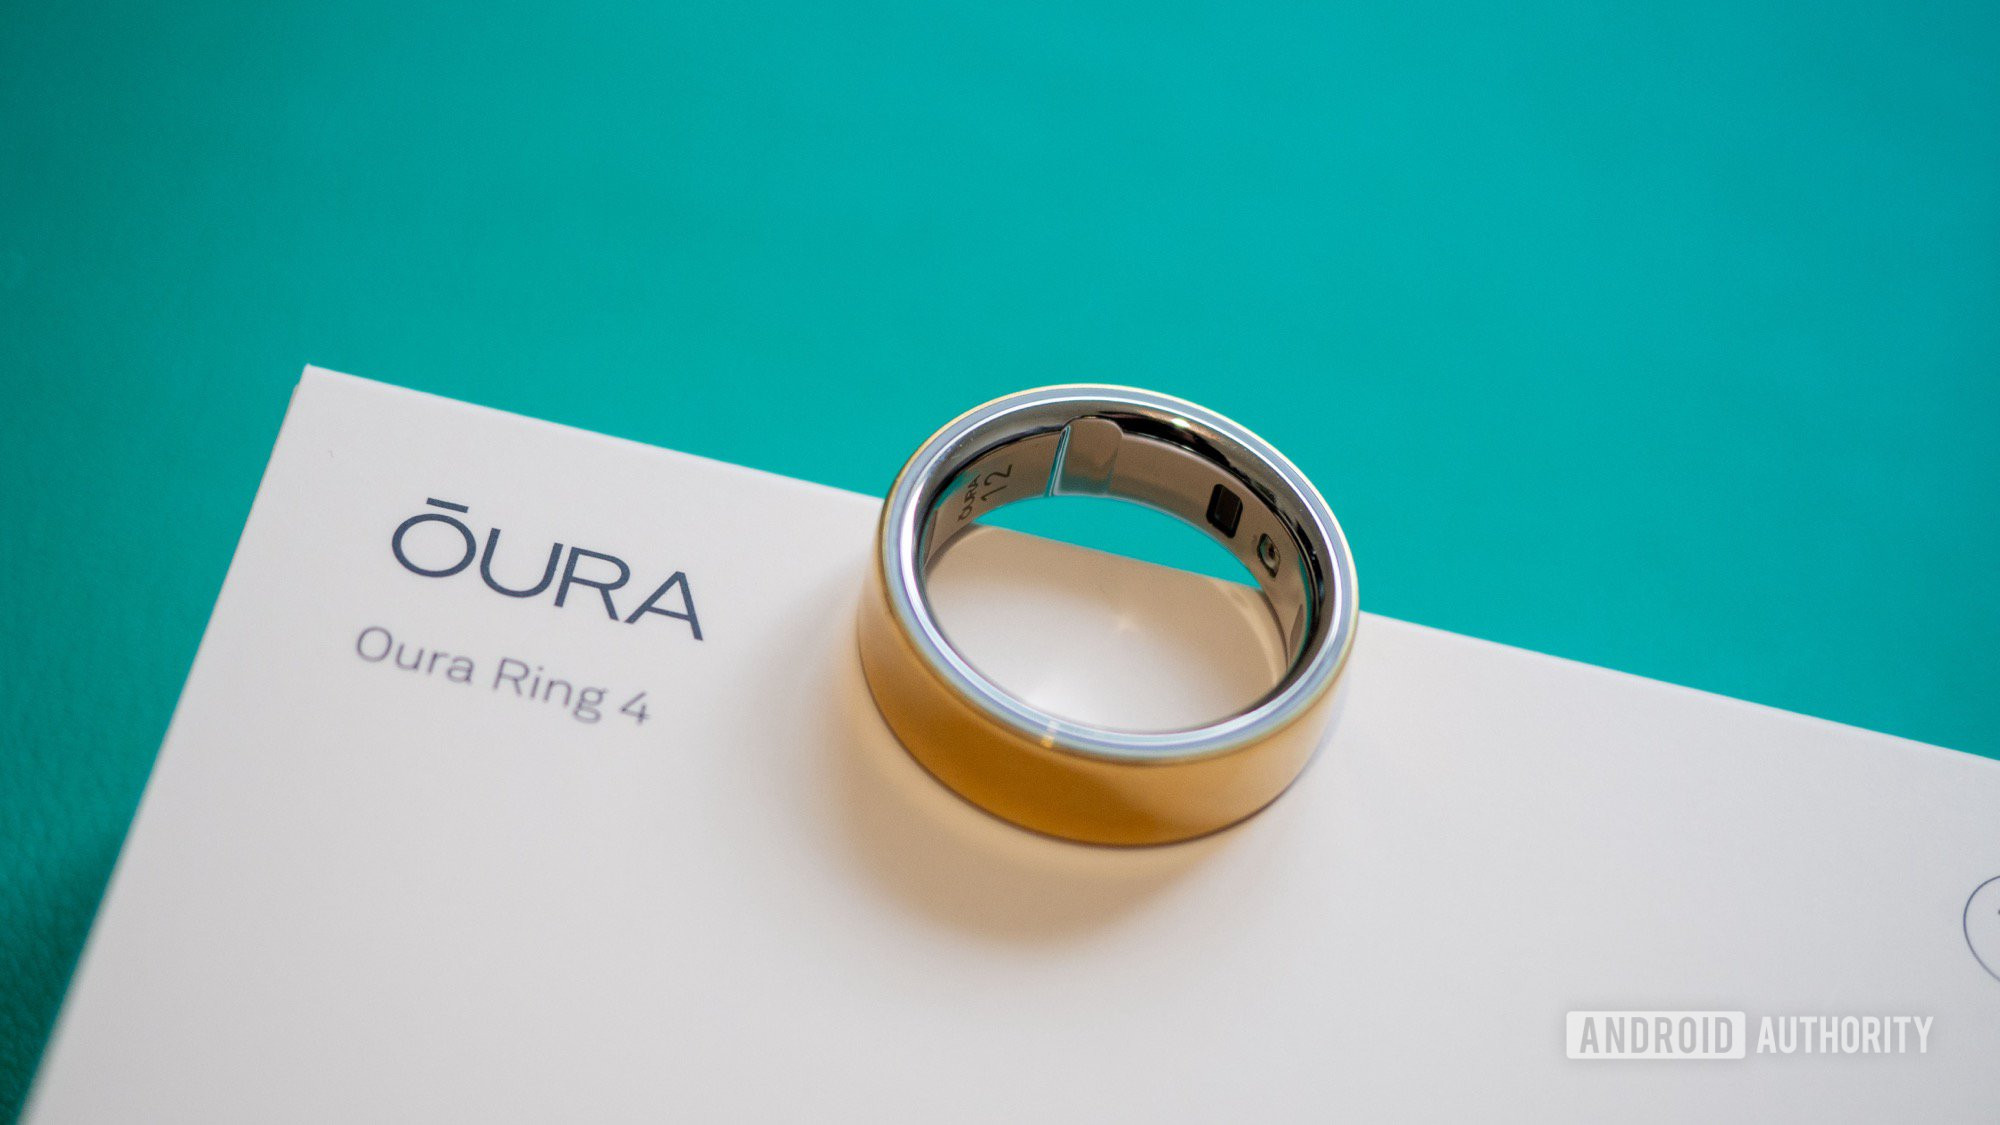
The Oura Ring 4 smoothes out the sensor bumps for a more comfortable feel without sacrificing the accuracy of its tracking. Automatic activity detection and a new app with even an ever better experience make this the best smart ring you can buy right now.
Having worn the Oura Ring 3 for well over 18 months now, I’ve been champing at the bit, waiting for its successor to land. In these same 18 months, smart rings have gone from an obscure wearable category to a mainstream accessory thanks, in no small part, to Samsung’s Galaxy Ring. But I stuck with my Oura ring because it still offered, in my opinion, the best experience. I’ve been curious, though, to see Oura’s response to this onslaught of competition.
Would the Oura Ring 4 propel it so far ahead that it would take the others a couple of years to catch up, or would this new ring be nothing but a simple nudge forward?
Fewer bumps, but still the same bulk
Rita El Khoury / Android Authority
The Oura team’s biggest achievement with the Ring 4 is flattening out the sensor bumps that stick out inside the ring (see image above), which improves comfort without sacrificing accuracy compared to the Oura Ring 3. This is a monumental step forward for all smart rings, and it shows why Oura has such a head start on all its competitors; they’ll all have to catch up to this new standard or look worse in every other comparison.
I’ve been wearing the Ring 4 for 10 days and I did notice a minor improvement in comfort. I have thicker fingers, so the bumps were never that disturbing to me, but for someone with bonier fingers, I think the difference in comfort will be much more noticeable. However, the fact that this was achieved without affecting data is what’s most impressive. I get the same results and the same accuracy for my sleep and heart rate as I did with the Ring 3.
By flattening out the sensor bumps for the Ring 4, Oura is taking a step ahead of all of its smart ring competitors.
I also love that the interior has been switched from epoxy to titanium; it just looks better and feels better against my skin. However, I find myself scratching my head over Oura’s decision not to coat the entire top titanium layer in some of its colorways. There’s a light middle layer visible from the sides on the silver, brushed silver, gold, and rose gold rings, but not on the black and stealth colorways. Check them out in the photo below.
Rita El Khoury / Android Authority
While you and I will know that this a high-end titanium ring, everyone else will see a white layer just below the metallic coating and think, “Oh, this must be a cheap plastic ring.”
The light middle layer, bulky design, and simple charging puck are all things Oura should have figured out by now.
Smart rings are supposed to look like pieces of jewelry and blend in with the rest of our accessories, so I do think this cheapens the Ring 4. You might get away with it on the silver and brushed silver versions, but it clashes too much against the gold and rose gold colors, which are incidentally much more expensive. Paying $499 ($150 more than the base price) to get an incomplete coating is unacceptable.
My biggest disappointment, though, with the Oura Ring 4 is that I kind of expected more. Or less, to be exact. I wanted this new-generation ring to be less bulky and less imposing. After testing the Samsung Galaxy Ring, I fell in love with its shorter, slimmer, more concave design. Samsung nailed that aspect: Its ring rests better against my other fingers, looks and feels less bulky on my hand, doesn’t get scratched as easily, and reflects light better (which makes it look more elegant).
Check the photos of the sizing rings below, in the same size. The Oura Ring 4 is white, and the Galaxy Ring is black. The difference might look minute, but for such a small item, I confirm to you that it really matters.
I’ve been wearing the two rings on the same hand for 10 days, and my gold Oura Ring 4 picked up a light scratch on the second day (check the red highlight below) and has developed some patina, while the Galaxy Ring still looks as good as new.
Rita El Khoury / Android Authority
Samsung, as well as a lesser-known brand RingConn that just released a pretty great Gen 2 model, also nailed the charging experience of their rings. Their portable cases are so much more convenient than a charging puck, especially if you travel or move around a lot. I have to plug and unplug the Oura puck each time I want to charge it, whereas I can charge the Galaxy Ring case once and then use it to fill up its ring multiple times.
So, while I do appreciate all the work that went into making the Oura Ring 4’s sensors smaller, I still think Oura has a lot of catch-up to do on the general design and aesthetic of its ring, as well as its charger.
More automated activity tracking
Rita El Khoury / Android Authority
The new Oura Ring 4 and app promise a more automated activity tracking experience — one improvement I was really excited to test. Previously, I had to remember to go into the app and start an activity to get proper tracking (continuous heart rate and GPS), which I literally never did because I’m so forgetful. Without that, I’d get a very basic activity tag but not much data, which made proper activity tracking near useless to me on Oura. I’d rely on my Pixel Watch 3 and Fitbit instead.
I don’t need to remember to start tracking; the Oura Ring 4 knows when I’m moving and switches into its active mode.
Now, the ring just knows that I’ve started to move and switches to this active tracking mode, even for short bursts. A 10-minute walk to the metro entrance, a quick 30-minute walk around the neighborhood; it tracked it all, and I didn’t have to tell it anything beforehand. I love that.
Just, uh, make sure you give the Oura app location permission before you do that, and don’t make the same mistake I did. Because you’ll end up with a nice heart rate graph and no map.
The best smart ring software experience, bar none
Along with the Ring 4’s release, Oura has updated its already excellent app to a fresh new design with more functionality. Things are better organized now, and it’s easier to see all of the daily scores the moment I open the app.
The readiness, sleep, activity, heart rate, and stress scores, along with my menstrual cycle day, are the first things I see on the Today tab. No more scrolling down large cards just to check one score. I can still do that, of course, but I like that there’s more visible data on top.
A great new feature is the ability to switch through the data (readiness, sleep, activity, heart rate and stress, and daytime stress) of any given day. If I’m looking at my bad readiness score on October 5, for example, I can immediately tap the five floating icons at the bottom to see if that was due to poor sleep and whether it affected my activity and stress during that day.
Oura has also gone a step further and made it possible to overlay daily movement, activities, and tags on top of the daytime stress graph. This is the kind of data integration I want to see from my trackers because I can quickly tell if my stress is related to movement or if it also happens when I’m inactive. Using tags, I can also add alcohol or caffeine consumption, fever, headaches, and any kind of meds, sickness, or element and track how that affects my stress. This makes Oura an invaluable tool if you’re trying to see how something — or anything really — affects your health.
Overlaying activity and tags on my stress graphs helps me understand what affects my stress positively and negatively.
I just wish this overlay was also available for the heart rate graph, and I’d love to see Oura figure out a way to show these tags in relation to readiness and sleep tracking, too. That would help me connect the dots better.
However, I’m not as much of a fan of the app’s new Vitals tab because it just shows those same vitals from the Today tab, except now you scroll through them vertically instead of horizontally. Perhaps a better use for that screen would be to show the incredibly valuable trends, which remain hidden in the side menu. Or at least give us the option to do that?
The third tab now houses a general My Health overlook, which highlights your resilience, heart health (cardiovascular age and cardio capacity), and sleep health (regularity, chronotype). It also gives you access to all of Oura’s reports (weekly, monthly, quarterly, and yearly) so you know how you’ve been progressing.
There are so many long-term trends that are worth checking out to gauge my overall health progress.
This last part, I think, is one of the most impressive aspects of the Oura experience compared to other fitness trackers I’ve used. Health is a journey, as the cliché says, and while most trackers focus on the day-to-day, leaving me to go dig around in separate graphs and stats to see the bigger picture, Oura does that for me. Every week, every month, every quarter, every year, I get an automatic report that tells me to pause and reflect on where I’m at. For now, Oura doesn’t interpret these for me (it just gives general explanations about what a good or bad score mean, or what an upward or downward trend reveal), but I can imagine that it will soon start tailoring its interpretation to my actual stats.
It’s also clear that Oura is using that long-term data to gauge the resilience, heart health, and sleep health stats. Plus, that data helps with the useful spotlight trends hidden in the side menu — seriously, Oura, just bring those to the forefront! I don’t have to look long there to see my health has taken a hit lately.
Of course, for those who want to dig deeper and see everything for themselves, there are still the super detailed graphs of every single one of the 25 metrics tracked by the Oura Ring 4, all visible by day, week, month, or year. And boy, are there graphs there! If you’re a stats nerd, you’ll love them.
Oura still gets me like no other fitness tracker does
Rita El Khoury / Android Authority
I’ve had a few rough weeks lately, between unending sickness and immense stress. Outdoor exercise has been nearly impossible, and indoor activity very limited. My sleep has taken a big hit, too. I know those aren’t the ideal situations to review a fitness tracker, but they are the ideal situations to see how well that tracker adapts to real life.
While my Pixel Watch 3 has been taunting me to move every hour and telling me I’m not meeting my cardio load, and my Galaxy Ring has been more or less a silent observer, Oura has been… kind. It’s silly to qualify an object and an app with a human quality, but that’s what I get from Oura’s messaging each time I open the app. Check the two screenshots below, taken on the same day, and see what I mean.
It suggested I switch on the rest mode when I had a fever; it told me to take it easy when I barely slept for three hours; and it positively encouraged me the one day I was able to get out and walk. There’s something here that makes me want to use the app, even when I’m not meeting my goals, whereas I dread opening Fitbit on those same days. You might think this leads to laziness, but no. When I was exercising frequently and feeling on top of the world, I still checked out the Oura app more than Fitbit because it felt more positively encouraging instead of just laying out numbers to me.
When I’m not achieving my goals, Fitbit taunts me, Samsung doesn’t do much, but Oura is kind.
Oura is also marketing its new Advisor, a privacy-first AI chatbot that knows your personal data and can help you achieve your goals by giving you actionable advice. I found it a bit basic for now, however. Perhaps that’s due to the fact that I’m not feeling well, to begin with.
Oura Ring 4 review verdict: Is it worth it?
Rita El Khoury / Android Authority
When you factor in everything I’ve said about the Oura Ring 4 so far, I think the conclusion is simple. Those looking for a jewelry accessory will find that the Samsung Galaxy Ring is a better buy. Oura decided to put its efforts and investments towards fighting the sensor bumps, so the aesthetic improvement had to take a backseat to comfort with this fourth generation.
But those who can look past the bulky design and care both about the stats that a ring gives them and the way it delivers those stats, then this is the one. The entire experience can be tailored to push you to achieve more or help you ease into a healthier lifestyle. Plus, the fact that it understands the need for rest days (and has understood them for years now) is just proof that the Oura Ring 4 was made by humans, not by machines that expect you to achieve your goals every single day.
This is the best smart ring experience out there; you just have to accept its aesthetics and monthly subscription.
Yes, the Oura membership is extremely expensive, but I think it’s worth it for the insights it delivers and the upgrades you receive over time. As I said, I’ve had the previous Ring 3 for 18 months and in that time, Oura has added so many new features that by the end of it, it felt like I’d bought a new ring. This is the kind of paid subscription that doesn’t make you feel bitter: You know your money is going towards more development, and you get more features and more value out of the gadget you bought over time. Even now, owners of the Ring 3 should have gotten the new app design and the automated activity tracking that the Ring 4 offers out of the box.
So, evidently, if you have the Oura Ring 3 and you’re happy with it, skip the Ring 4. There isn’t much that’s changed here that’s worth the upgrade — unless you have bony fingers and the sensors really annoy you — and you’ll still be getting many of the same software features down the line. But if you’re looking for a new smart ring and you can factor in that monthly investment, then you won’t be disappointed by the Oura Ring 4.
Thinner design • Refreshed app experience • Smarter health sensing
The top smart ring gets an upgrade.
The Oura Ring 4 is the biggest rival to the Samsung Galaxy Ring. The new generation features upgraded hardware and a sleeker design and pairs with a refreshed Oura app for an improved software experience.
128GB of storage is barely forgivable these days on a high-end flagship, but Google keeps releasing Pixel phones with that base level. The Pixel 9 series, for example, can do 8K video upscaling, save a Gemini Nano model locally for faster AI computations, and costs at least $799 while still offering you a base 128GB storage tier. That feels unfair to me.
But Android 15 has a trick up its sleeve that can help mitigate the dreaded “storage full” notification that keeps popping up on my Pixel phones. It’s called “app archiving,” and it works as a temporary band-aid to clear some storage while I figure out exactly what I need to erase from my phone.
How I use app archiving on Android 15
Mishaal Rahman / Android Authority
Archiving an app on Android 15 takes the app off my phone without affecting any of its data. Essentially, it hibernates the app on my Google account until I’m ready to install it again. And once I do that, the app is back with all of my data. If I was signed into an account, I would still be signed in; if I had changed any settings, they’d still be changed. This is so much better than uninstalling an app and then reinstalling it from scratch when needed.
So when my Pixel phone hits 95% storage, I just take a quick look at my apps and figure out which ones I don’t immediately need. Then, I go in and start archiving them to free up my phone’s local storage. Maybe I’m not traveling anytime soon, so my travel apps can go off my phone. Or maybe I can live without Instagram and its space-hogging app for a few days. I could sacrifice either Pocket Casts or Spotify and only use one audio app for a couple of days. Or, don’t tell my boss, but Slack can take a break for a couple of days, too.
App archiving is a real boon if you take a lot of photos and videos like I do, save some music or podcasts for offline use, and end up hitting the storage full notification all too often. Especially when that notification pops up at an inopportune time and I don’t want to think about what I should delete or not right away.
Basically, this allows me a short respite so I can keep using my phone for a bit longer and take my time later to figure out what kind of media, cache, or data I can take off permanently to reduce my storage usage. (Pro tip: What I often end up doing is going through my videos in Google Photos and hitting Delete from device to remove the largest ones from the phone but keep them in my Photos account.)
Better yet, I can do some preemptive work and set several apps to automatically archive whenever my phone’s storage runs low, so I don’t have to think about this on the spot. Here’s how everything works.
How to manually archive an app on Android 15
Tap and hold on an app’s icon on your home screen or your app drawer.
Tap the info icon (i inside a circle) on the top left of the pop-up.
Choose Archive.
How to automatically archive some apps when storage is low
On the home screen or in the app drawer, tap and hold on the icon of the app that you want to automatically archive.
Tap the info icon (i inside a circle) on the top left of the pop-up.
Turn on Manage app if unused.
Repeat this for every app you want to automatically archive.
This makes sure that whenever your phone storage is near full, it will automatically go through these apps and archive them for you, so you don’t have to manually remember to do it.
How to unarchive an app on Android 15
The app icon remains in your app drawer but with a cloud download overlay. Just tap that, and the app will restore to its previous state.
Don’t have Android 15? There’s still a way to archive apps
If you haven’t received Android 15 on your Pixel or if you don’t have a Pixel, then there’s still a way to use app archiving. The fact is that this is more of a Google Play Store feature than an Android feature and has been available through the Play Store for a while. However, you don’t have granular control there; it’s an all-or-nothing affair and you trust Google to choose your least used apps to automatically archive them when your storage runs low.
Open the Google Play Store.
Tap your account avatar on the top right.
Go to Settings.
Tap General.
Turn on Automatically archive apps.
To see which apps have been archived, you can do this:
Tap your account avatar on the top right in the Play Store.
Go to Manage apps & device.
Tap the second Manage tab.
Scroll through the selection chips to reveal Archived.
Android 15 came full of new features and capabilities, but Google also reminded us of some features that are available to devices with previous Android versions. Such is the case of the AI-supported Theft Protection feature. Let’s go over what this feature is all about, and help you enable it on most devices running Android 10 or newer.
QUICK ANSWER
To enable Theft Protection on Android, go to Settings > Google > All services > Theft protection and enable Theft Detection Lock. Tap on Turn on to confirm the change.
Here, you can also modify extra security features like Offline Device Lock, Remote Lock, and Find & erase your device.
JUMP TO KEY SECTIONS
What is Theft Protection on Android?
Ryan Haines / Android Authority
Theft Protection is a feature that Google introduced alongside Android 15. It uses AI to detect if someone forcefully took your phone from your hands and ran away.
You’ll also find added features within this setting to further protect your private data and information. For example, the system can lock your device if it goes offline, as it’s common for thieves to turn on Airplane Mode after stealing devices.
There’s also Remote Lock, which makes it possible to use the device’s phone number to lock it. You just need to go to android.com/lock, enter the phone number, and hit Lock device.
Of course, you can always use Find My Device for these secondary features, but it’s nice to have options, and the Theft Detection Lock is certainly a nice bonus.
How to enable Theft Protection
Now that you know what this feature is all about, it’s time to learn how to enable Theft Protection on Android 10 or newer devices. It will come disabled by default, so make sure to turn Theft Protection on, as you never know when your phone will get stolen. Best be prepared!
Launch the Settings app.
Go into the Google option.
Tap on All services.
Scroll down to the Personal & device safety section.
Select Theft protection.
Enable Theft Detection Lock.
Tap on Turn on to confirm your selection.
On this page, you can also enable Offline Device Lock, Remote Lock, or tap on Find & erase your device to look into your Find My Device options.
FAQs
Theft Protection is available for most devices using Android 10 or newer.
Theft Protection uses a few tools to determine if your device was forcefully taken from your hands. These include the device’s motion sensors, Wi-Fi, and smart device connections.
No. Theft Protection is meant to protect your private information when the device is unlocked, so it will only work if your device is unlocked and in use.
Android 15 is bringing Private Space to Android devices.
Private Space allows users to create a separate, secure environment for sensitive apps and data.
Android owners who have long envied Samsung’s Secure Folder for its ability to create a locked, private space on their devices no longer need to be jealous. With the rollout of Android 15, these users now have an equivalent feature called “Private Space.”
Officially announced back in May, Private Space can now be found on Android phones after updating to Android 15. It’s a native feature designed to be a separate and secure environment within your phone, accessible only through additional authentication (PIN code). It allows you to isolate apps like health trackers or banking apps, shielding sensitive data from prying eyes.
Think of this feature as a digital safe on your phone. Locking Private Space will make the apps placed in it invisible to others. It will also hide apps from your apps list, recent apps view, notifications, and settings. If you need even more privacy than that, you also have the option to hide the existence of Private Space from view on your phone.
While using apps within Private Space, a lock icon will appear in the status bar to remind users of the secure environment. Any app in Private Space will have all settings, usage statistics, and intent redirections related to it hidden while it’s locked. This ensures that even if someone knows your phone’s main screen lock, they cannot access your Private Space apps or data.
Setting up Private Space
Setting up Private Space involves navigating to “Security & Privacy” in your device’s settings. The process will require authentication to ensure only you can create it. You’ll also have the option to link a Google account for easy app downloads within Private Space.
After setup, Private Space will be found in your app drawer, marked with a “Private” label and a lock icon. If you want to know how to use the feature, check out our how to hide apps with Private Space article.
We got our first look at this feature during the Android 14 QPR3 beta, but the version rolling out now is the finished product.
Got a tip? Talk to us! Email our staff at [email protected]. You can stay anonymous or get credit for the info, it’s your choice.
After a lengthy wait, Google officially announced Android 15 and the availability of the new OS on Pixel devices, including the Pixel 6 series and higher, the Pixel 6a and higher, the Pixel Fold and newer, and the Pixel Tablet.
If you don’t have a Pixel device, betas are available on devices from several OEMs, including HONOR, OPPO, Xiaomi, and Nothing. Alternatively, you can use the 64-bit system images with the Android Emulator in Android Studio.
Android 15 release timeline
Looking back at Android 15’s release schedule, you’ll notice the lengthy wait between the last beta rollout in July and the final release date of October 2024. Notably, we only saw one minor beta update during this timespan. Despite this, that wait does seem well worth it. The new operating system brings many welcome features to bolster security, improve usability, and enhance functionality across several apps and usage spheres.
Some highlights include the arrival of Private Space, the addition of Theft Protection, and quality of life improvements, from improved battery life to better camera controls for third-party apps like Instagram.
Below are all the significant milestones for Android.
Android 15 milestones:
February 16, 2024 — Android 15 DP1
March 21, 2024 — Android 15 DP2
April 11, 2024 — Android 15 Beta 1
April 22, 2024 — Android 15 Beta 1.1
April 25, 2024 — Android 15 Beta 1.2
May 15, 2024 — Android 15 Beta 2
May 20, 2024 — Android 15 Beta 2.1
June 3, 2024 — Android 15 Beta 2.2
June 18, 2024 — Android 15 Beta 3
July 1, 2024 — Android 15 Beta 3.1
July 18, 2024 — Android 15 Beta 4
August 14, 2024 — Android 15 Beta 4.2
October 15, 2024 — Android 15 official release for Pixels
Now that Android 15 is official, we expect more companies to announce their update plans in the coming days. You can follow the progressive rollout of the OS throughout the industry from our Android 15 OEM hub.
Spotify is opening up its music videos beta program to 85 additional markets.
The streaming service has also made a few improvements to the beta.
The US is not one of the new markets.
You may remember Spotify rolled out a music video beta back in March for Premium subscribers. At the time, the test was only available to 11 markets, not including the US. The streaming company is now greatly expanding access to this beta, while also making a few improvements in the process.
Spotify has announced that it is starting to roll out its music videos beta in 85 additional regions. These markets join the original 11 and Egypt to bring the total number of supported countries to 97. In the blog post, the firm avoids specifying what countries are included in these 85 new markets, but it looks like the US has been skipped over once again. A Spotify spokesperson has told The Verge:
Music videos on Spotify are still in beta and we look forward to bringing it to even more users across more markets, including the US, in the future.
As before, the service is still limited to Premium subscribers. If you’re a paid user, however, you’ll be able to switch between audio and video on iOS, Android, desktop, and TVs.
On top of the expansion news, Spotify mentioned a few improvements to the beta. One such improvement makes switching from audio to video more seamless by having the video pick up from where you left off. Before this change, the video would start from the beginning if you switched over from audio.
The company has also added video indicators next to track names to make available videos easier to see in search results. And if you want to go full screen, you can now just turn your phone over to landscape mode.
The available catalog of music videos is still limited. However, Spotify has said it plans to expand its collection over time.
Got a tip? Talk to us! Email our staff at [email protected]. You can stay anonymous or get credit for the info, it’s your choice.
After numerous beta releases, the stable version of Android 15 is finally here! The latest update includes new privacy features, improved foldable and tablet features, and so much more. While you can eventually snag it through an over-the-air update, you might not want to wait that long. In this guide, we take a look at how to install Android 15 on your Pixel phone.
What devices can install Android 15 today?
Robert Triggs / Android Authority
Android 15 was just literally released so for now you’ll only find it on Pixel devices. Here’s a full list of Pixel products that can install Android 15 is here:
Google Pixel 8 Pro
Google Pixel 8
Google Pixel 8a
Google Pixel Fold
Google Pixel Tablet
Google Pixel 7a
Google Pixel 7 Pro
Google Pixel 7
Google Pixel 6a
Google Pixel 6 Pro
Google Pixel 6
If you don’t see your Pixel on that list, you’re stuck on Android 14 (or earlier) indefinitely. While the stable, final build of Android 15 isn’t available for other brands just yet, if you want to test out Android 15 on a backup device you’ll find the Android 15 beta is still available on some HONOR, IQOO, Lenovo, Nothing, OnePlus, OPPO, realme, Sharp, TECNO, vivo, and Xiaomi smartphones. If you own a recent smartphone from one of these brands, check out our comprehensive list of devices that support the Android 15 beta.
How do I install Android 15?
Adamya Sharma / Android Authority
There are three ways to install Android 15 on a Pixel phone. The first is the assisted method, which we recommend to nearly everyone. This uses the Chrome browser to automate most of thebeta steps and is most useful if you are moving to Android 15 from any prior version.
There are also non-assisted methods using ADB and Fastboot. These are more complicated but give you a bit more freedom. These methods are also helpful if you are already on a version of Android 15, as you’ll be able to install a newer version of Android 15 without needing to wipe your phone first.
Remember that in all cases, moving from Android 14 to Android 15 requires a complete wipe of your phone’s data. If you don’t want to do this, you should not install Android 15 on your phone.
If you’re ready, it’s time to prepare!
Prepare to install Android 15
You will need the following materials and prerequisites to get started:
A Windows, macOS, Chrome OS, or Linux computer with access to the internet and the latest Chrome browser.
A short, thick USB cable for connecting your phone to the computer. The original USB cable that came with the phone is best for this.
Before you move on to the next steps, double-check that you have everything you need. You don’t want to get into the process of installing Android 15 and discover you aren’t fully prepared! Once you’re ready, continue on by using either the assisted or manual installation methods below.
Install Android 15 using the assisted method
FINAL WARNING: This process will unlock your bootloader and completely erase all your phone’s data.
Ensure your computer has the proper drivers for your phone, which you can grab from Google’s Pixel drivers page. This is an essential step — if you skip this, flashing will not work!
Plug your phone into your computer using the USB cable.
In your phone’s Settings, go to System > Developer options. If you don’t see Developer options, go to Settings > About phone and scroll all the way down to the Build number. Tap on the Build number seven times until your phone says you are a developer. Developer options should be available now.
In Developer options, enable OEM unlocking and USB debugging.
Select the version of Android 15 you’d like to install. For some models, there’s a 64-bit-only version and a version that also supports 32-bit software. Either one works. If you don’t know which one to pick, choose the one that just says “(signed),” which supports both 64-bit and 32-bit software.
Follow along as the flashing tool takes care of everything for you. Simply follow the instructions and remember not to touch your phone unless specifically instructed to do so by the flashing tool.
That’s it! You should now have Android 15 installed on your Pixel smartphone.
Install Android 15 using the manual method
If the more straightforward assisted method mentioned above does not work for you, you can try the manual methods. Primarily, there are two manual methods:
Flashing Factory Images through Fastboot: This requires an unlocked bootloader but is the recommended path for upgrading from Android 14 to Android 15 without the assisted method. Unlocking the bootloader will completely wipe your device. The Fastboot installation will wipe your device again, but you can alter this behavior.
Sideloading OTA packages through ADB and Recovery: This method is useful for Pixel devices with a locked bootloader and for users who want to preserve data moving from Android 15 to Android 15. This is not recommended if you are moving from Android 14 to Android 15.
Irrespective of the method you choose, there are some common steps that you need to get in place:
Install ADB on your computer by following our guide. The process also installs Fastboot on your computer, as Fastboot is part of the Android SDK Platform Tools alongside ADB.
Ensure that you have USB Debugging enabled on your smartphone:
On your smartphone, go to Settings > About Phone.
Locate the Build Number entry. Tap seven times on it. You will see a toast popup saying, “You are now a developer” or “No need, you are already a developer.” This means that Developer Options has been unlocked on your device, and you will see a new entry in your Settings menu.
Now navigate to Settings > Developer Options > Enable USB Debugging. Confirm your selection when prompted in the warning.
Ensure your computer has the proper drivers for your phone, which you can grab from Google’s Pixel drivers page.
Connect your phone to the computer. Presuming this is the first time you are connecting your phone to your computer, you will get a prompt on your phone requesting authorization for the connection. Grant it.
With this, you will have your common steps in place. You can now move forward with the rest of the tutorial, depending on the install path that you choose.
Flashing Factory Images through Fastboot
FINAL WARNING: As part of this process, your phone will be completely wiped. Please ensure you have taken adequate backups before proceeding.
Download the official Factory Images on your computer for your phone. Ensure you download the file for your specific phone only, as flashing the file intended for a different phone model may mess with the installation process and render your device useless.
Optional but recommended: Verify the SHA-256 checksum of the file you have downloaded. This reassures you that the file has been downloaded completely and correctly. Google mentions the SHA-256 checksum next to the download link.
Unzip the file to a convenient location. For ease of installation, you can copy the contents to the directory where ADB and Fastboot are located on your computer.
Connect your phone to your computer.
Open up a command prompt on your computer and run the command adb reboot bootloader. This will reboot your phone to Fastboot mode.
Unlock the bootloader of your phone: You do this by running the Fastboot command fastboot flashing unlock. Note that this will erase all data on the device.
If your device reboots into the OS after a data wipe, you will need to skip all the setup steps and enable USB Debugging again. Once you do, reboot back into the Fastboot mode.
On a Windows PC, double-click on the flash-all.bat file. This will run the batch installation file and execute all the necessary commands by itself. On a Mac/Linux PC, you will need to run flash-all.
In case you want to preserve your system and app data between installations, you will need to open the flash-all script in a text editor program and delete the “-w” attribute from the command. This attribute denotes a wipe, so remove it if you do not want a wipe.
Once the script finishes, your device will reboot into the new OS.
Optional but recommended: Relock the bootloader of your phone by rebooting your phone into Fastboot mode and running the command fastboot flashing lock.
Sideloading OTA packages through ADB
FINAL WARNING: This process should only be used if you’re already on Android 15. If you are on any other version, use the assisted method or Fastboot.
Download the official OTA update zip file on your computer for your phone. Ensure you download the file for your specific phone only, as flashing the file intended for a different phone model may mess with the installation process and render your device useless.
Optional but recommended: Once the file has finished downloading, rename it to a simpler name, like abc.zip, for example. This will save you from typing out the long name that the file initially downloaded with.
Optional but recommended: Verify the SHA-256 checksum of the file you have downloaded. This reassures you that the file has been downloaded completely and correctly. Google mentions the SHA-256 checksum next to the download link.
Place the file in the directory where ADB is located on your computer.
Connect your phone to your computer.
Open up a command prompt on your computer and run the command adb reboot recovery. This will reboot your phone to recovery mode.
In case your phone does not reboot into recovery, you can also manually reboot into recovery by shutting down your device and then pressing and holding the power button and volume up button.
Use the volume keys to navigate to the Apply Update from ADB option in the Recovery menu. Press the power button to select it.
On the command prompt on your computer, run the command adb devices. This will return a device serial number with “sideload” written next to it. This indicates that your phone is connected in sideload mode and is ready to receive further installation commands.
On the command prompt on your computer, run the command adb sideload abc.zip. You will need to replace “abc.zip” with the filename that you have chosen.
ADB will install the update zip file on your phone.
Once installation is complete, choose the Reboot system now option on your phone, and your device will reboot into the freshly installed Android 15 build.
That’s it! You should now have Android 15 installed on your Pixel smartphone.
FAQ
Android 15 beta has been around for a while but the stable build arrived on October 15, 2024.
If you have a recent Pixel phone, you should get Android 15 the same day it goes stable. If you have a non-Pixel, you will need to wait for a time. The amount of time depends on your manufacturer. Generally, if you have a recent Samsung flagship or the most recent OnePlus flagship, you should likely see Android 15 before the end of 2024.
Yes. Certain manufacturers already have their own beta programs open to some phones. However, you’ll need to check with your phone’s specific manufacturer to see if a) there’s a beta program and b) your phone is eligible for it. Be aware stable versions are still incoming.
If you use any of the methods on this page, you will need to wipe your phone. However, if you don’t want to manually update you’ll eventually get an over-the-air (OTA) update, that will not wipe your phone.
After several beta releases, Android 15 was officially announced on October 14, 2024, and it was made available right away for Pixel devices. While that’s all great for Pixel owners, you might be wondering when your phone will get the Android 15 update. This article will serve as a continuous update hub for Android 15 releases for all major device makers. We highly recommend you bookmark this article and return to it occasionally to check if there have been any updates for your phone!
If you want to know when your phone will get the previous official version — Android 14 — check out our Android 14 update tracker.
What’s new in Android 15?
Edgar Cervantes / Android Authority
Android 14 was, at best, an iterative update. Yes, it added a bunch of improvements across privacy, security, accessibility, and other areas to do with the inner workings of Android. However, user-facing features were few and far between. Some notable ones that come to mind include the ability to create custom wallpapers, the Health Connect integration, and lock screen customization options.
Thankfully, Android 15 features several improvements including a new Privacy Space feature for hiding private apps and other information, a new Theft Detection Lock that uses AI to keep your data safe if your phone is stolen, and plenty more. For tablet and foldable owners, you can expect new features that let you easily pin and unpin your taskbar on the screen as well as a few other improvements.
That’s far from all. For one, Android 15 will offer OS-level support for app archiving and unarchiving. This means infrequently used apps can be archived and unarchived from settings, allowing users to free up space without losing their data. You can also expect some other accessibility, privacy, and security features, such as support for Braille displays in Android TalkBack and OS-level API for end-to-end encryption for contact keys.
Android 15 also brings new data types to Health Connect and partial screen sharing so users can record just an app window rather than the entire device screen. To get a lowdown on everything new in Android 15, make sure you read our Android 15 features hub.
When will your phone get Android 15?
Adamya Sharma / Android Authority
Naturally, Google’s devices were the first to receive the Android 15. For now that’s the only devices that officially have support. That said, here is a brief list of brands committed to the beta program. You expect at least some of these brands to be among the first to move to Android 15 in theory, though Samsung and OnePlus are probably the two brands listed below that are most likely to happen first.
HONOR
IQOO and vivo
Lenovo
Nothing
OnePlus
OPPO
realme
Sharp
TECNO
Xiaomi
Below you will find more details about some of the companies’ current beta programs. We’ll be sure to update you with information on any planned stable Android 15 releases for these brands as we learn more.
Google
You can install Android 15 beta on the Pixel 6, Pixel 7, or Pixel 8 series devices, as well as the Pixel Fold and Pixel Tablet. That said, the stable build is now available and is the recommended path.
HONOR
The Magic 6 Pro and the Magic V2 are the centerpieces of the company’s Android 15 beta developer program. In a press release, the company said it would “continue to support developers with the next update to Android 15 beta later this summer.”
IQOO and vivo
The vivo X100 and IQOO 12 joined the Android 15 beta rollout on May 15, albeit with limited availability.
The company noted in a release that the beta is offered to X100 owners in regions “including India, Taiwan, Malaysia, Thailand, Hong Kong, and Kazakhstan.” IQOO 12 owners in Thailand, Indonesia, Malaysia, and India will also receive beta builds.
Nothing
The Nothing Phone 2a received the first Android 15 beta on May 14. Near the end of May, Nothing opened up the beta to the Phone 2.
OnePlus
On May 14, OnePlus rolled out the first Android 15 beta to the unlocked OnePlus 12 and OnePlus Open.
TECNO
TECNO didn’t confirm a release timeline but did confirm that the Camon 30 Pro 5G will be part of the Android 15 beta program.
How to try Android 15 on other devices
If you don’t have any of the devices above, you can use the 64-bit system images with the Android Emulator in Android Studio. You can configure the Android Emulator to explore all the new Android 15 features, and it also allows you to emulate various screen sizes and device characteristics.
Interestingly, the likes of ASUS, Samsung, and Sony have yet to announce any beta program details. Nevertheless, we’ll update this article as and when Android 15 is available on devices from other Android brands.